

| 05-16-2011, 02:33 PM | #24 |
|
Free Thinker

16943
Rep 7,455
Posts |
Another good one from Gavin. I've read about double-processing RAW files but wasn't sure how to do it until seeing this.
__________________
Last edited by M_Six; 05-16-2011 at 02:40 PM.. |
|
Appreciate
0
|
| 05-16-2011, 05:36 PM | #26 |
|
Not willing to take advice

4053
Rep 1,527
Posts |
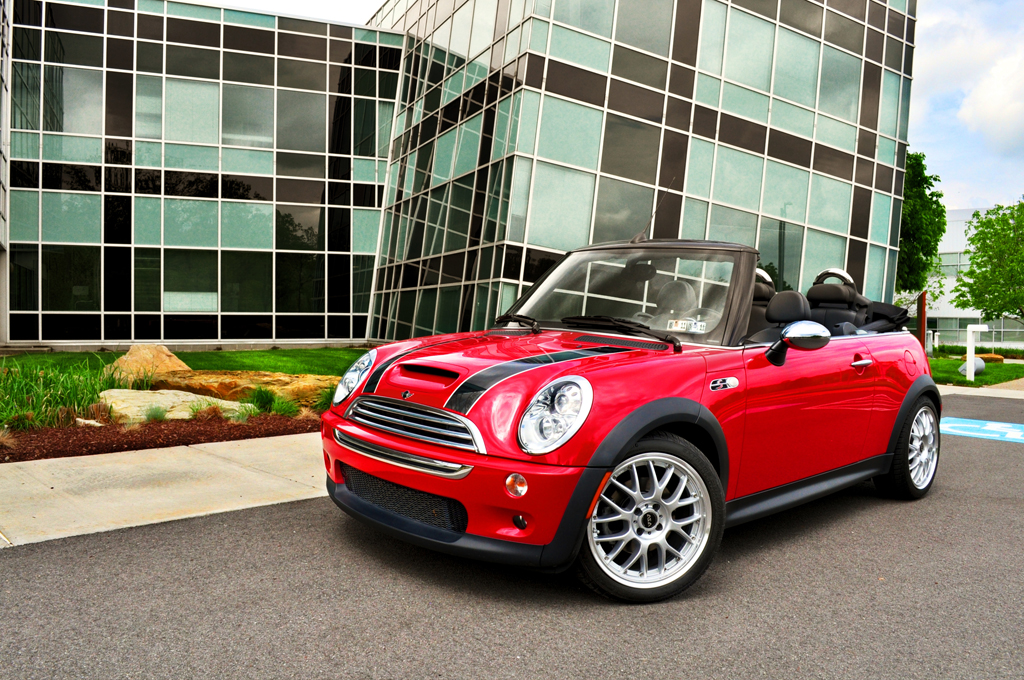
Okay...so here's what I did. First, I uploaded the three images of the first picture to the site. They are the size they were taken in (medium) so I'm just posting the links.
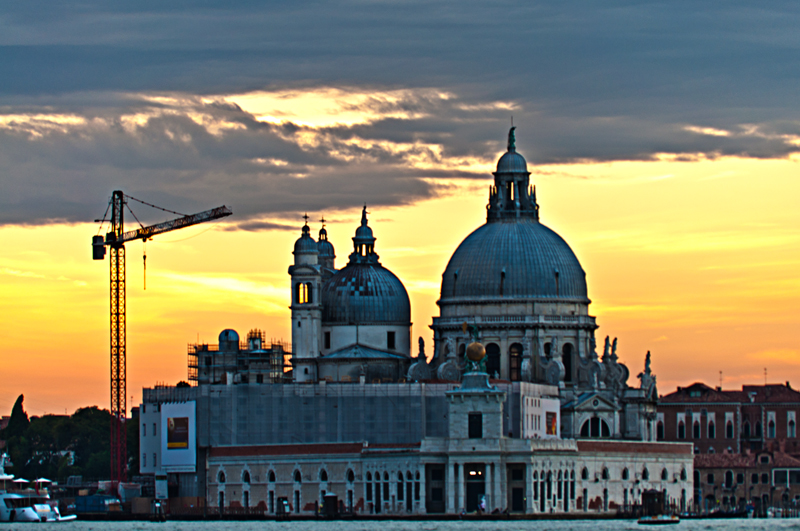
http://users.zoominternet.net/~kirin//DSC_0239.JPG http://users.zoominternet.net/~kirin//DSC_0240.JPG http://users.zoominternet.net/~kirin//DSC_0241.JPG As stated, I don't have the Raw file from these...but I have a Raw file of a well known church located near Rome (technically, it's not Italy). I've never posted my HDR of this, but can do so later. File is rather large...10MB. I do have this in all 3 exposures, but I'm only posting the main one (if the others are needed, let me know). Unfortunately, I may have questions once I go through the videos above. I've never put nef files up on my FTP, let me know if there are any issues and I can post them to another location. http://users.zoominternet.net/~kirin//DSC_0178.nef I truly appreciate the help...
__________________
Proud owner of 4 Turbos and 1 Supercharger
|
|
Appreciate
0
|
| 05-16-2011, 07:34 PM | #27 |
|
Free Thinker
16943
Rep 7,455
Posts |
Here's a Photomatix HDR from your three images. I didn't do much beyond the default setting in Photomatix other than tweak the black and white points. Then I saved the resulting file and opened it again in PS. I used the Soft Light layer method I described before to bring back the highlights in the grill and tires. Then I did it again using black to bring out the detail in the lights and driver's side mirror. Then I duped the image and desaturated slightly and used color balance to tone down the building colors. Then I used a layer mask to bring back the car, grass, trees, and sky.
__________________
|
|
Appreciate
0
|
| 05-16-2011, 08:24 PM | #28 |
|
Not willing to take advice
4053
Rep 1,527
Posts |
I'm about to give up on the raw image thing...I'm no good at it. I think I need to find more material.
I do appreciate the comments on using the soft light settings. I think it will help a ton. Also, the items listed above will help with how I select the areas to tone down things like the building (the way I did it before looked more like a cut and paste). The more I think about what you said...I agree the building was a bad location to shoot in. The building is amazing though...guess I had different thoughts on how it would turn out.  So going back to the original pictures, that takes out Test shot #2 as well...is #3 a decent choice for a shot, or no?
__________________
Proud owner of 4 Turbos and 1 Supercharger
Last edited by ShopVac; 05-16-2011 at 08:35 PM.. |
|
Appreciate
0
|
| 05-16-2011, 09:11 PM | #29 |
|
Free Thinker
16943
Rep 7,455
Posts |
Yep, shot three is a good location. And actually I really like your enhanced HDR shot. I know some folks hate overblown HDR, but I think it's just another way of looking at things. I've seen lots of overblown HDR images that are impressive as hell, especially for web work. Your #3 HDR is right up there.
__________________
|
|
Appreciate
0
|
| 05-16-2011, 09:39 PM | #30 | |
|
Not willing to take advice
4053
Rep 1,527
Posts |
Quote:
My only concern with it is the over detail on the rocks...I'm questioning if it is distracting and if it should be toned down? Of the three...it didn't come out like a drawing like the rest. I can use some of the lighting techniques to touch it up some.
__________________
Proud owner of 4 Turbos and 1 Supercharger
|
|
|
Appreciate
0
|
| 05-18-2011, 08:35 AM | #32 |
|
Not willing to take advice
4053
Rep 1,527
Posts |
I'll post up mine later tonight...I don't think they are far off. Do you recall the settings you used coming out of PhotoMatix?
__________________
Proud owner of 4 Turbos and 1 Supercharger
|
|
Appreciate
0
|
| 05-18-2011, 07:46 PM | #33 |
|
Not willing to take advice
4053
Rep 1,527
Posts |
So, here's my image that I did earlier.
 A few things on this... 1) In looking, I probably have the picture waaaay over saturated. I think I should tone it down a bit, as your pictures more depict what I recall...and mine is just an overblown image? 2) In doing mine, I still took the three images that I shot and worked through these. And maybe the issues are that I'm not having the same problem indoors with what I have shooting outdoors during daylight. So what did you do with the raw file to before even getting them into PhotoMatix that would help me down the line?
__________________
Proud owner of 4 Turbos and 1 Supercharger
|
|
Appreciate
0
|
| 05-19-2011, 05:18 AM | #34 |
|
Major General
 
695
Rep 7,308
Posts
Drives: see above.
Join Date: Apr 2005
Location: Yorkshire, UK
|
I use different settings for most photos on PM - I do have a base set that I start from. You do have way too much colour in there. You need to play with the settings more to learn them - the presets are fun but tend to produce the halo'd cartoon image as seen on yours.
I did nothing with the raw before opening in PM. I started the same way on my first hdr! 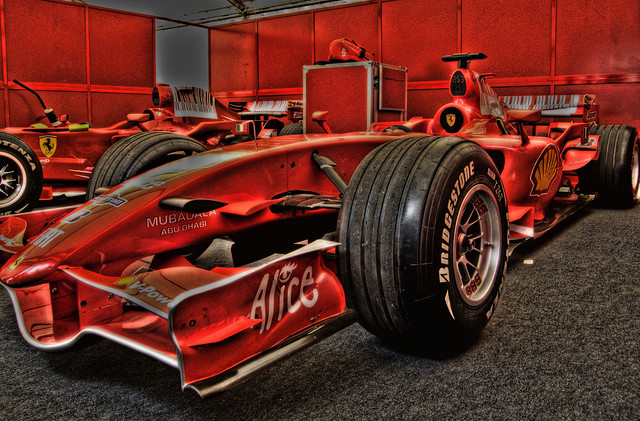 Ferrari F1 by rozter, on Flickr
__________________
|
|
Appreciate
0
|
| 05-19-2011, 11:03 AM | #35 | |
|
Not willing to take advice
4053
Rep 1,527
Posts |
Quote:
Do you start with any presets and adjust from there, or do you just work the image right off the bat?
__________________
Proud owner of 4 Turbos and 1 Supercharger
|
|
|
Appreciate
0
|
| 05-19-2011, 11:21 AM | #36 |
|
Free Thinker
16943
Rep 7,455
Posts |
Slightly different take on it.

__________________
|
|
Appreciate
0
|
| 05-19-2011, 12:34 PM | #38 |
|
Free Thinker
16943
Rep 7,455
Posts |
Mostly the same process I've been talking about.
Phase 1: 1.Open file and double-click layer to unlock it. 2. Open new layer and change blend mode to Soft Light. 3. Using white, paint over areas that need to be lightened. Control lighting using opacity. When done with lightening, Merge Down. 4. Open new layer and change to Soft Light, then use black to paint over areas which need to be darkened. Again, control level with opacity and Merge Down when done. 5. Flatten image. Phase 2: 1. Go to Image => Adjustments => HDR Toning 2. I set the Strength way up (2.95 or so) but kept the Radius fairly low (around 35). 3. Adjust the Tone Curve on the Histogram as needed. I pulled the center slightly down to darken the whole image a bit. 4. Play with the Shadow and Highlight sliders to suit your taste. 5. Same thing with the Detail Slider. 6. If you like the result, hit ok. Phase 3: 1. Duplicate the main layer. 2. On the duplicate layer, go to Filter => Other => High Pass and set the radius to about 20 pixels and apply. 3. Set the blend mode of that layer to Soft Light. 4. Using the little Eye icon, click back and forth so you can see the difference that the High Pass filter made. If you like it, Merge Visible. And that was pretty much it. Don't be afraid to experiment along the way. It's how you learn.
__________________
|
|
Appreciate
0
|
| 05-19-2011, 01:05 PM | #39 | |
|
Major General
695
Rep 7,308
Posts
Drives: see above.
Join Date: Apr 2005
Location: Yorkshire, UK
|
Quote:
PS is a completely different animal and requires a lot of knowledge of the program. Photomatix is pretty much limited to moving sliders around. If it were my photo, I'd use PS.
__________________
|
|
|
Appreciate
0
|
| 05-19-2011, 01:22 PM | #40 | |
|
Free Thinker
16943
Rep 7,455
Posts |
Quote:
__________________
|
|
|
Appreciate
0
|
| 05-19-2011, 05:27 PM | #41 | |
|
Not willing to take advice
4053
Rep 1,527
Posts |
Quote:
Outside of a simple merge in PS, I'm not sure I did much more than that...but I do like the results you guys came up with...It's really helping. Care to try another...an outdoor image of a sunset? Or are you guys getting bored of me asking questions...
__________________
Proud owner of 4 Turbos and 1 Supercharger
Last edited by ShopVac; 05-19-2011 at 05:34 PM.. |
|
|
Appreciate
0
|
| 05-19-2011, 07:37 PM | #42 |
|
Free Thinker
16943
Rep 7,455
Posts |
Post it up.
__________________
|
|
Appreciate
0
|
| 05-19-2011, 08:05 PM | #43 |
|
Not willing to take advice
4053
Rep 1,527
Posts |
So here's what I did...I placed another raw file up.
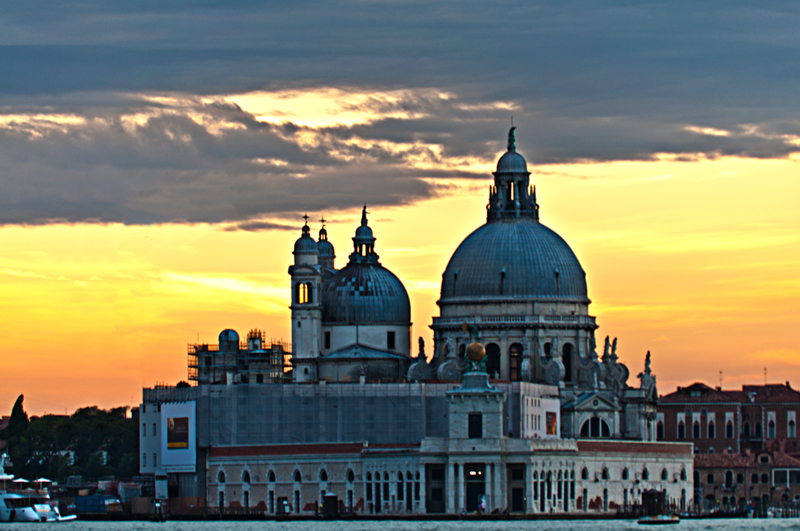
http://users.zoominternet.net/~kirin//DSC_0234.nef Originally, I pulled this picture from the file prior to the Raw file, merging in PS (prior to using PhotoMatix)  To me, the above picture is a too dark (especially on the sides)...has dark shadows, and a rather large halo over the building. I reprocessed the same 3 pictures in PhotoMatix, and chose a preset that I normally would. Followed through with my typical editing in PS using Topaz Adjust.  in this pic, there's a huge contrast between the blue and orange...so much I think it needs toned down. Learning what I did from the other day, I can ditch the halo effect...but the PM brought in some ghosting issues that I didn't have before. And I don't know what the heck that is in the bottom left? So, going with Mark's technique, I opened the Raw in PS and did similar edits to what was listed...judging some by eye  In this, I like how the sky turned out, but not the building. Too blue (cold temperature) to match the warm sky. Also, if you look on the left side of the domes, there's a pinkish tint on the edge. I assume I need to paint this out? Final steps where Paul's method of opening in PM, making the edits there.  Once I was finished in PM, I did use Topaz DeNoise...as it was rather grainy. I think the building looks more realistic, but don't like the sky as much. Almost seems like I need to go somewhere between the two? Building for the one, sky from the other. I noticed this picture also has that pinkish layer on the left side of the dome. So...am I getting close with this? I'll let you guys tell me...maybe I'm just going through these too fast
__________________
Proud owner of 4 Turbos and 1 Supercharger
Last edited by ShopVac; 05-19-2011 at 08:13 PM.. |
|
Appreciate
0
|
| 05-19-2011, 09:11 PM | #44 |
|
Free Thinker
16943
Rep 7,455
Posts |
My hacks. First is with the crane, second without it. I basically did the double adjustment like he did in the video above. I duplicated the layer and adjusted the top layer for the sky. Then I adjusted the bottom layer for the buildings. Then I used a layer mask on the upper layer to mask out the buildings so the adjusted buildings from the bottom layer showed through. Once I was happy with it, I used a high pass filter to sharpen it up some. The whole picture is pretty soft.
__________________
|
|
Appreciate
0
|
Post Reply |
| Bookmarks |
|
|


